Den 0xc000000e fejl, når de forsøger at starte op vinduer betyder, at du har at gøre med beskadiget Boot Configuration Data. Boot Configuration Data er en global butik med alle muligheder og indstillinger relateret til boot på nyere Windows-pc'er.
Du får denne fejl, når du prøver at starte din enhed, og du får en sort skærm, der giver dig instruktioner om, hvordan du reparerer din computer ved hjælp af en installationsdisk eller et gendannelsesdrev. Desværre er det den eneste måde, du har det gendannelsesdrev på, at du løser dette problem, så du skal have fat i en, før du starter. Hvis du ikke har det, er det ret nemt at oprette en ved hjælp af Rufus eller Windows Media Creation-værktøj fra enhver anden pc eller en bærbar computer.

Du bliver også nødt til at starte i din BIOS for at ændre startrækkefølgen og få din pc til at starte fra gendannelsesdrevet i stedet for din harddisk. For at gøre det skal du bruge følgende trin:
- Indtast BIOS- eller UEFI- indstillingerne ved at trykke på den tildelte nøgle til dit bundkortproducent, før Windows starter. Denne nøgle er normalt Esc, Slet, F2, F8, F10, F12 eller Backspace, afhængigt af producenten. Du kan foretage en online-søgning på, hvordan du åbner BIOS efterfulgt af din computermodel.
- Når du er indeni, skal du navigere til Boot Brug instruktionerne i BIOS til at ændre din opstartsrækkefølge, og indstil enten CD-ROM'en eller USB-porten til at være den første enhed, afhængigt af om dit gendannelsesdrev er en CD eller et flashdrev .
- Gem dine indstillinger, og afslut.

Metode 1: Genopbyg Boot Configuration Data
For at gøre dette skal du starte din computer fra gendannelsesdrevet. Hvis du har konfigureret din BIOS med ovenstående trin, kan du gøre det ved at trykke på en vilkårlig tast, når prompten vises på din skærm. Når computeren er startet fra gendannelsesdrevet, skal du bruge følgende trin til at genopbygge BCD:
- I dialogboksen Windows Setup skal du indstille alt til de relevante værdier, vælge dit sprog og klikke
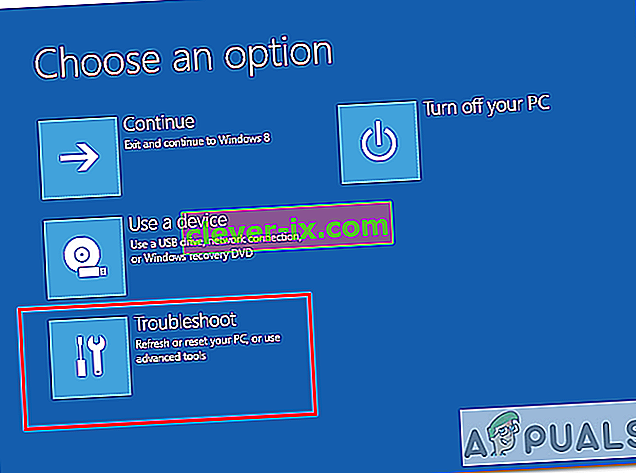
- I nederste venstre hjørne skal du klikke på Reparer din computer og vælge at foretage fejlfinding på skærmen Vælg en indstilling.
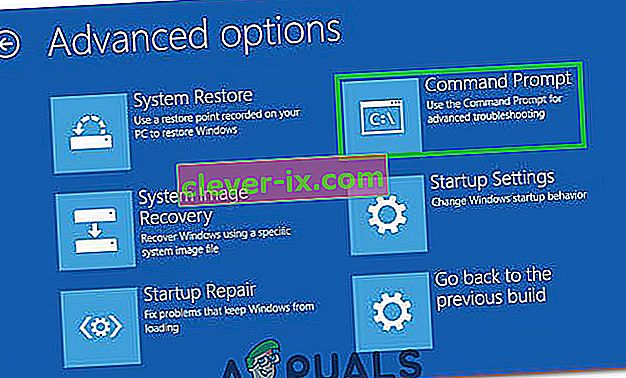
- I Fejlfinding skal du klikke på Avancerede indstillinger, og klik på Kommandoprompt.
- Når kommandoprompten åbnes, skal du skrive følgende kommandoer og trykke på Enter på tastaturet efter hver af dem:
bootrec / scanos bootrec / fixmbr bootrec / fixboot bootrec / rebuildbcd
- Genstart din computer, og den skal starte helt fint op uden at skulle stå over for problemet igen.

Metode 2: Reparer dit operativsystem med gendannelsesdrevet
Denne metode reparerer også dit operativsystem med kommandoprompten på gendannelsesdrevet, og du skal kunne starte i Windows uden at stå over for problemet igen. Start fra gendannelsesdrevet, og følg instruktionerne nedenfor.
- Brug trin 1 til 3 fra den foregående metode for at komme til kommandoprompten på gendannelsesdrevet.
- Når du er inde i kommandoprompten, skal du skrive kommandoerne nedenfor efterfulgt af en Enter på dit tastatur for at udføre dem. Den StartRep.exe nytte korrigerer boot miljø værdier og bør fastsætte BCD fejl. Bemærk, at du muligvis skal gentage dette trin flere gange, hvis det mislykkes.
cd x: \ sources \ recovery StartRep.exe
- Hvis det forrige trin til reparation af Windows ikke hjalp, skal du skrive bcdedit i kommandoprompten for at se værdierne til Windows Boot Manager.
- Bemærk værdierne for Enhed . Hvis de er ukendte , skal du skrive følgende kommandoer, hver efterfulgt af en Enter for at udføre dem. Bemærk, at du skal udskifte C: med den partition, hvor dit operativsystem er installeret, hvis det er nødvendigt.
bcdedit / sæt {DEFAULT.EN_US} enhed partition = c: bcdedit / sæt {DEFAULT.EN_US} osdevice partition = c: bcdedit / sæt {BOOTMGR.EN_US} enhed partition = c:- Når kommandoprompten er færdig, skal du lukke den, fjerne gendannelsesdrevet og genstarte dit system. Det burde ikke have nogen problemer med at starte op nu.
Den eneste ulempe ved disse løsninger er, at de kræver et restitutionsdrev, tålmodighed og stærke nerver. Hvis du følger dem, som de er beskrevet, skal du dog rette den fejl, du har fået, og fortsætte med at bruge din enhed som før.
Metode 3: Aktivér Windows 10 WHQL-support i BIOS
Indstillingen Windows 10 WHQL Support findes i nogle af OEM'erne. Det har to grundlæggende funktioner: kontrollerer for signerede drivere under opstartsprocessen og giver dig mulighed for at aktivere UEFI-support. Hvis du bruger Windows 10, skal du aktivere det, og derefter kan din computer starte normalt. Men hvis det ikke er valgt, kan din computer muligvis starte med fejl 0xc000000e. Så du kan få adgang til BIOS for at se, om Windows 10 WHQL Support-indstillingen er aktiveret. Hvis ikke, skal du aktivere det for at prøve.
Du skal bemærke, at Windows 10 WHQL Support-indstillingen ikke understøttes på alle computere. Hvis din computer ikke har det, kan du gå til at kontrollere, om UEFI-support er aktiveret på din computer. Hvis ikke, kan du aktivere det for at se, om fejlkoden 0xc000000e forsvinder. For at aktivere det:
- Luk computeren helt ned, og lad den sidde i mindst et par minutter.
- Når du har sikret dig, at der er gået tilstrækkelig tid, skal du starte computeren igen, og du skal bemærke " Tryk på denne knap for at starte i Bios-tilstand ".
- Tryk på knappen for at starte i Bios-tilstand.
- Efter vellykket opstart i Bios-tilstand skal du kontrollere, om der er en Windows WHQL-indstilling i Bios.
- Hvis det er til stede, skal du trykke på "Enter" for at vælge det, når du har fremhævet det ved hjælp af piletasterne, og vælge "Aktiveret" for at aktivere det på din computer.

- Kontroller, om dette løser problemet.

Hvis opstartsfejl Windows 10 0xc000000e stadig vises efter aktivering af Windows 10 WHQL Support-indstilling eller UEFI-support, skal du muligvis nulstille BIOS / UEFI-konfigurationen på din computer.
Metode 4: Genopbyg BCD via Easy Recovery Essentials
Easy Recovery Essentials er et automatiseret systemreparationsfunktion med et enkelt klik, der indeholder fuld reparation og rekonstruktion af BCD for at løse “0xc000000e” -fejlen, selv i tilfælde hvor Windows ikke starter som følge af fejlen.
Den automatiske opstartsreparationskomponent i EasyRE vil løse alle BCD-relaterede problemer, rette BCD eller genskabe den fra bunden ved hjælp af den korrekte kodning og sti til den partition, der nægter at indlæse korrekt. Det markerer også disken som online for at sikre, at den fungerer korrekt.
Easy Recovery Essentials vil garanteret rette “0xc000000e” -fejlen automatisk ved hjælp af den indbyggede automatiserede reparationsmulighed. EasyRE er i øjeblikket tilgængelig til Windows XP, Vista, 7, 8, 10, og det kan downloades og oprettes på enhver pc.
- Få fat på en anden computer, som du kan bruge til at oprette en USB, som vi vil bruge til at starte computeren fra.
- Download Easy Recovery Essentials herfra.

- Brænd billedet.
- Start din pc fra Easy Recovery Essentials CD eller USB, du oprettede.
- Når EasyRE kører, skal du vælge "Automatiseret reparation" og klikke på Fortsæt.
- Når EasyRE har scannet din computers drev, skal du identificere og vælge drevbogstavet til din Windows-installation på listen og derefter klikke på den automatiserede reparationsmulighed for at starte.
- Easy Recovery Essentials begynder at analysere det valgte drev for problemer. EasyRE vil teste for og forsøge at rette automatisk fejl med disken, partitionen, bootsector, filsystem, bootloader og registreringsdatabasen. Intet indgreb er påkrævet, da EasyREs reparation er fuldautomatisk.
- Når processen er afsluttet, rapporterer EasyRE sine resultater. Klik på knappen Genstart for at genstarte din pc og teste ændringerne.

Metode 5: Nulstil BIOS / UEFI-konfiguration
Nogle brugere sagde, at deres fejl 0xc000000e-problem blev løst ved at nulstille BIOS / UEFI-konfigurationen. Så du kan overveje at prøve denne metode for at se, om dette problem kan løses.
Trin 1. Åbn BIOS-menuen
For at nulstille BIOS til standardindstillinger skal du åbne BIOS-menuen og finde indstillingen Standardindstillinger først.
Windows 10-brugere kan få adgang til avancerede startindstillinger Windows 10 og komme ind i BIOS-menuen. Du kan klikke på Start -> Strøm, trykke på og holde Skift-tasten nede og klikke på Genstart-knappen for at genstarte Windows til Windows Recovery-miljø. Klik derefter på Fejlfinding -> Avancerede indstillinger -> UEFI Firmware-indstillinger, og klik på Genstart for at åbne BIOS-indstillingsskærmen.
Alternatively, you can also restart your computer normally and press the required key in the startup screen to boot into the BIOS settings window. The hotkey is varied from different computer manufacturers, and it could be F12, Del, Esc, F8, F2, etc.
Step 2. Find the Setup Defaults Option
The name and location of the “Setup Defaults” option may be different from various computers. It generally calls like: Load Default, Load Setup Defaults, Load Default Settings, Load BIOS Defaults, Load Optimal Defaults, etc.
Use the arrow keys on the computer keyboard to find the BIOS setup default option in the BIOS settings screen. You may find it in one of the BIOS tabs.
Step 3. Reset BIOS
After you find the Load Setup Defaults option, you can select it and press the Enter button to start resetting the BIOS to factory default settings in Windows 10.
At last, you can press F10 to save and exit BIOS. Your computer will automatically reboot. If you need to change BIOS settings again in the future, you can follow the same instructions to access BIOS again to change it.
Method 6: Mark Boot Disk As Online
It is possible in some cases, that the disk that you have connected to the computer or the USB that you are trying to boot from has been marked as offline by the computer. Some computers tend to prevent extra applications, hardware, and other things from being able to run as soon as the computer starts because it allows for more convenient and fast startup experience. Therefore, in this step, we will be marking the Disk as online.
You still need to use a bootable USB medium to do this job. We will show you a step-by-step guide here:
- After booting your computer from the bootable USB drive, you need to go to Next > Repair your computer. Then, you will enter WinRE.
- Go to Troubleshoot > Advanced options > Command Prompt.
- Make sure to properly enter your login credentials if you are asked by the computer.
- Type in the following command inside the command prompt to successfully launch the disk part utility on your computer.
diskpart
- Type in either one of the following commands in the next window to list the currently connected disk drives to your computer.
List Disk List Volume
- Once the disks have been listed, you need to identify the disk that contains the Windows operating system and the one that you want to mark as active.
- After identifying it, select the disk using the following command and replacing the alphabet with the driver letter of that disk.
select disk A Select Volume A (Replace A with the Drive Letter)
- After you have successfully selected the disk, you must mark the disk as online in order to initiate the recognization process of the disk at startup. Use the following commands to do that.
Online Disk Online Volume
- Type in the following command to successfully get out of the command prompt and restart your computer after that.
Exit
- Check to see if marking the Disk as online has fixed your issue.

Method 7: Check your data cables, BIOS and drivers
Unplug all HDD data cables, and then plug them again. Revert to the previous drivers and BIOS settings if they were changed, or use “Restore factory settings” option in the BIOS. Make sure to write down all current BIOS settings that were previously selected, just in case it is required to switch back. If the error is caused by a change of the SATA disk controller’s mode in the BIOS or firmware, the fix can be as simple as entering the BIOS and toggling the SATA controller’s “mode” setting. The exact instructions differ from one manufacturer to the other, but the options will resemble what is shown in the screenshots below.
To check the boot order, follow these steps:
- Restart the computer
- Press the necessary key to open the BIOS menu. This key depends on the computer manufacturer and computer model. This is usually listed on the first screen that appears on the monitor. It can be any of the following: Esc, Del, F2, F8, F10 or F12.
- If the screen shows multiple keys, find the key to open “BIOS”, “setup” or “BIOS menu”
- Attempt to toggle between all three (or more) modes until a combination that results in Windows booting successfully once more is found.
Method 8: Boot Windows In Safe Mode
If above solutions didn’t fix the problem, then Start Windows into safe mode. This will start your PC with minimum system requirements, will not load startup programs, add-ons etc. And allow performing troubleshooting steps to fix Boot Error 0xc000000e:
Before you enter the safe mode, you need to enter the Windows Recovery Environment (winRE). To do this, you will repeatedly turn your device OFF, then ON:
- Hold down the power button for 10 seconds to turn off your device.
- Press the power button again to turn on your device.
- On the first sign that Windows has started (for example, some devices show the manufacturer’s logo when restarting) hold down the power button for 10 seconds to turn off your device.
- Press the power button again to turn on your device.
- When Windows restarts, hold down the power button for 10 seconds to turn off your device.
- Press the power button again to turn on your device.
- Allow your device to fully restart and you should boot into the Windows Recovery Environment.
Now that you are in the Windows Recovery Environment, you will follow these steps to take you to safe mode:
- On the Choose an option, screen, select “Troubleshoot” and then “Advanced options.”
- Now click on “Startup Settings” and click on “Restart.”
- After your device restarts, you’ll see a list of options. Select option “4” from the list or press “F4” to enter Safe Mode.

Note: If you need to exit safe mode, simply restart your device, or:
- Press the “Windows logo key + R.”
- Type “msconfig” in the Run box and then select “OK”.

- Select the Boot tab and under Boot options, clear the Safe boot checkbox.

Method 9: Check your disk with CHKDSK utility
If the hard drive has its file integrity compromised, it is possible to use built-in Windows CHKDSK utility to scan the disk and fix the file system errors.
- Connect a USB drive that has been made bootable or insert the Windows Installation Disk on your computer.
- After connecting one of these, boot from that connected device.
- After booting your computer from the device, click on “Next” and then on the “Repair your Computer” option.
- On the next window, click on “Troubleshoot” and then on the “Advanced” Option.

- On the next screen, make sure to select the “CommandPrompt” option to successfully launch into the command prompt.
- Provide the login credentials of your account in order to boot inside the cmd.
- Inside the command prompt, type in the following command to successfully run the check disk utility on your computer.
chkdsk C: /f (Make sure to replace the "C" with the Drive letter of your partition).
- Confirm any on-screen prompts and wait for the scan to be fully completed.
- Check to see if the issue is fixed by performing this step.
Method 10: Disable fast startup Feature
If your computer has been set up to use the Fast Startup feature, you might be getting this error message on your screen because of doing so. The Fast Startup feature is known to malfunction with some operating systems and hardware combinations.
Basically, when enabled, the feature automatically sends some launch configurations to be stored in your RAM to allow for a faster startup as indicated by its name but this configuration data can sometimes be corrupted which can lead to this error on your computer. Therefore, in this step, we will be disabling it completely. For that:
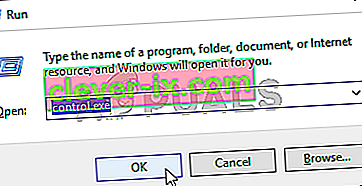
- Press “Windows” + “R” to open the Run prompt.
- Type in “Control Panel” and press “enter” to launch the classical Control Panel interface.
- Inside the control panel, click on the “Hardware and Sound” option and then select the “Power Options” button.

- Inside the power options, click on the “Choose what the power button does” from the left side.
- Click on the “Change Settings” option if the fast startup option is greyed out.
- Make sure to uncheck the “Turn on Fast Startup” option and save your changes.
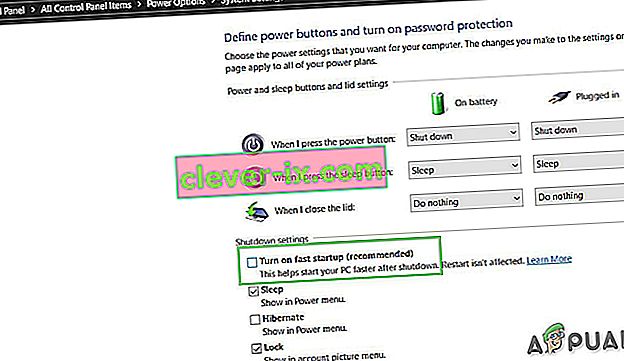
- Closeout of the window and terminate any unnecessary applications.
- Click on the “Start Menu”, click on the “Power Options” and select “Shutdown” from the list.
- This option should completely power down your computer and after performing a complete shutdown, wait for some minutes before turning your computer back on.
- After the computer turns back on, check to see if the error message is fixed.
Note: This solution can only be applied if you are able to sometimes boot up your computer normally and are only encountering this error momentarily.


Method 11: Repair Corrupted System Files
It also possible in some situations that certain system files might have been corrupted due to a storage failure or due to some other reason. Therefore, in this step, we will be performing a complete repair of the corrupted system files and then we will check to see if doing so fixes this issue. For that:
- Press “Windows” + “R” to open the Run prompt.
- Type in “cmd” and then press “Shift” + “Ctrl” + “Enter” to launch the command prompt with admin privileges.

- Type in the following commands one by one and press “Enter” after each to successfully run an SFC scan and a DISM Scan on your computer.
DISM /Online /Cleanup-Image /RestoreHealth sfc /scannow
- Restart your computer completely once these scans are completed.
- Check to see if by performing these scans, you were able to fix this issue on your computer.

Method 12: Run Windows Startup Repair
Startup Repair is capable of diagnosing and fixing the found issues. For example, it can automatically scan system files, registry settings, configuration settings, etc. and try to fix the problem on its own. Startup Repair is especially useful when your computer is unbootable. Since your computer fails to boot, Windows can boot into WinRE automatically. While, if it doesn’t appear, you can interrupt the boot process three times in a row, and then the WinRE screen appears. Alternatively, if you have a bootable USB medium, you can also set your computer to boot from it and go to Repair your computer to enter WinRE.
After you have successfully booted into the Windows Recovery Environment, click on the “Troubleshoot” option, and from there, select the “Advanced Options” screen. Inside the advanced options, select the “StartupRepair” button to successfully initiate the Startup Repairing process. Windows will begin to diagnose your computer automatically. When the process ends, your computer will restart automatically. You can wait to see whether it can boot successfully.

Løsning: Sørg for, at der ikke er tilsluttet yderligere enheder, før du hopper ind i kommandolinjen eller Startup Repair, det er bedst at prøve en anden genstart med det færreste antal enheder og eksterne drev tilsluttet computeren. Dette vil sikre, at intet, der for nylig blev tilføjet til computeren, ikke forårsager dette problem. Det ville være bedst at frakoble eventuelle nylige USB-drev, cd'er, dvd'er osv. Dette inkluderer også en hukommelseskortlæser. Sørg for, at alle eksterne drev og USB-nøgler eller USB-jumpdrev er blevet afbrudt, og prøv derefter igen.


