Nord VPN er en af de gamle spillere i VPN-verdenen, og dens Windows-applikation betragtes som en af de bedste i pc-verdenen. Nord VPN er meget forskelligartet, hvis det tales med hensyn til funktionalitet og fleksibilitet. Ud over support på tværs af platforme har den også forskellige servere placeret i forskellige lande, som du kan vælge imellem.

På trods af at applikationen har været på markedet i lang tid, rapporterer brugerne, at de ikke er i stand til at oprette forbindelse til Nord VPN. Det stopper enten med at oprette forbindelse efter en potentiel opdatering, eller anmodningen til DNS-servere returnerer enten et 'time-out' svar.
Hvad får Nord VPN til ikke at oprette forbindelse?
Da en VPN bruger hele internetarkitekturen i et computersystem, er der flere grunde til, at din Nord VPN muligvis ikke kan oprette forbindelse korrekt. Nogle af disse er anført nedenfor.
- IPv6: Nord VPN understøtter tilsyneladende ikke IPv6-protokollen i nogen af dens kommunikationer. Så hvis dette er aktiveret, kan du muligvis ikke oprette forbindelse.
- Tredjepartsprogrammer: Det er kendt, at tredjepartsprogrammer er i konflikt med softwaresystemet og konkurrerer om ressourcer; dermed får den ikke til at oprette forbindelse korrekt.
- Netværksadapter: Da Nord bruger en separat netværksadapter til at kommunikere med internettet, kan det være tilfældet, at netværksadapteren ikke fungerer korrekt, og du skal genstarte den.
- Fejl i netværk: Nogle gange kan netværkskonfigurationerne på din computer være i en fejltilstand, der overhovedet ikke har forbindelse. Vi kan prøve at opdatere alle variablerne i dette tilfælde.
Før vi starter med løsningerne, skal du sørge for, at dit internet rent faktisk fungerer . Hvis dit internet ikke fungerer korrekt, kan Nord ikke etablere en korrekt forbindelse og give dig adgang til et tunnelnetværk.
Sørg for, at du bruger et privat netværk (ikke skole, arbejde eller offentlige steder som hospitaler), og at ingen fuldmagter er involveret. Når du har dobbelttjekket, at dit internet fungerer fint, skal du fortsætte.
Løsning 1: Deaktivering af IPv6
IPv6 (Internet Version Protocol 6) er den nyeste version af IP i en computers netværksarkitektur. Som standard bruger vi stadig IPv4 og er stadig ikke overgået til IPv6 permanent. Der kan dog være nogle af jer derude, der er begyndt at bruge IPv6 til internetforbindelse. Det ser ud til, at IPv6 ikke fungerer korrekt med Nord VPN. Derfor vil vi deaktivere det og kontrollere igen.
- Højreklik på dit netværksikon på din proceslinje, og vælg Åbn netværks- og internetindstillinger . Klik nu på indstillingen Skift adapterindstillinger fra indstillingerne.

- Når du er i adapterindstillinger, skal du højreklikke på den adapter, du bruger, og vælge Egenskaber .
- Når du er i adapteregenskaber, skal du fjerne markeringen fra IPv6- indstillingen og sikre dig, at IPv4 er aktiveret. Gem ændringer og afslut. Genstart computeren, og kontroller, om fejlen er løst, og at du er i stand til at oprette forbindelse til Nord VPN.

Løsning 2: Kontrol af tredjepartsapplikationer
Der er adskillige andre applikationer og programmer, der synes at være i konflikt med Nord VPN i dens drift. Hvis der er mere end et program, der forsøger at få adgang til en ressource, vil der være en løbetilstand, og de fungerer ikke som forventet.

Du skal hente task manager (Windows + R og 'taskmgr') og kontrollere alle de applikationer, der kører i baggrunden. En sådan applikation, der vides at forårsage problemer, var Glasswire Elite . Sørg for, at du enten afinstallerer det, eller at det er deaktiveret, når du prøver at oprette forbindelse til Nord VPN.
Bemærk: Du kan også prøve at rense boot din computer. Dette deaktiverer alle eksterne tredjepartsapplikationer og starter kun de nødvendige. Nu kan du prøve at oprette en forbindelse. Hvis du lykkes, betyder det, at der var en applikation, der forårsagede problemet. Du kan arbejde dig tilbage ved at aktivere hver applikation og kontrollere igen.
Løsning 3: Ændring af serverplacering
Nord VPN giver brugerne mulighed for at vælge deres serverplacering. Disse servere er spredt over hele verden og giver forbindelse i henhold til deres geografiske placering, dvs. en server tættere på dig forventes at være hurtigere. Vi vil prøve at ændre den serverplacering, som du prøver at oprette forbindelse til, og se om dette løser problemet, der ikke opretter forbindelse.
- Start Nord VPN, og klik på serveroverskriften til stede øverst i applikationen.

- Vælg nu en anden server end før, og efter du har valgt, skal du prøve at fyre VPN'et op igen. Hvis du oplever den samme adfærd, kan du prøve at vælge en anden server og teste netværket på et andet websted.
Løsning 4: Genstart netværk / TAP-adapter
Nord VPN opretter en virtuel netværksadapter på din computer, som den kan bruge til at kommunikere information. Det fungerer som en bro, hvor Nord VPN ændrer indstillingerne, så den kan starte og vedligeholde en VPN-forbindelse. Nogle gange går dette i en fejltilstand, der får dig til ikke at oprette forbindelse til din VPN-server. Vi genstarter adapteren korrekt, hvilket vil sikre, at alle konfigurationer af den genstartes.
- Tryk på Windows + R, skriv “ ncpa. cpl ”i dialogboksen, og tryk på Enter.
- Alle netværkskortene vises på listen foran dig. Vælg TAP-adapteren, højreklik på den, og vælg Deaktiver .

- Når du har deaktiveret det, skal du vente et øjeblik. Højreklik derefter på det igen, og vælg Aktiver . Prøv nu at forbinde Nord VPN og se om dette gør tricket.
Løsning 5: Skylning af netværksstak
Der er utallige eksempler, hvor skylning (opdatering) af netværksstakken på din computer løser forskellige VPN-relaterede problemer (inklusive Nord). Denne proces vil skylle dine DNS- og IP-indstillinger og sikre, at der ikke er ukorrekte indstillinger, der kan være i konflikt med applikationen.
- Tryk på Windows + S, skriv "kommandoprompt" i dialogboksen, højreklik på applikationen og vælg Kør som administrator .
- Når du er i en forhøjet kommandoprompt, skal du udføre følgende kommandoer en efter en efterfulgt af Enter-tasten efter hver kommando:
ipconfig / frigiv ipconfig / flushdns ipconfig / fornyt netsh winsock reset netsh interface ipv4 reset netsh interface ipv6 reset netsh winsock reset katalog netsh int ipv4 reset reset.log netsh int ipv6 reset reset.log

- Luk nu kommandoprompten, og prøv at starte Nord VPN igen. Kontroller, om du kan få forbindelse til det korrekt.
Løsning 6: Geninstallation af Nord VPN (sammen med TAP-adapteren)
Hvis alle ovenstående metoder ikke virker, skal du sørge for, at din Nord-installation er korrekt, og at der ikke er noget galt med installationsfilerne. TAP-adapteren vil også blive geninstalleret i processen, fordi Nord VPN administrerer adapteren, og den kun er til dens brug. Sørg for, at du er logget ind som administrator. Hvis geninstallation ikke fungerer, skal du sørge for, at dine legitimationsoplysninger er korrekte, som du indtaster tjenesterne ikke er udløbet.
- Tryk på Windows + R, skriv "appwiz.cpl" i dialogboksen, og tryk på Enter.
- Når du er i applikationsadministratoren, skal du søge efter posten Nord VPN fra listen, højreklikke på den og vælge Afinstaller .

- Genstart nu din computer, og download applikationen igen fra Nord VPNs officielle hjemmeside. Efter at have indtastet dine legitimationsoplysninger, skal du prøve at oprette forbindelse igen og kontrollere, om du kan oprette VPN-forbindelsen korrekt.
Løsning 7: Brug af en alternativ VPN-tjeneste
Der er mange VPN-klienter derude på Windows-markedet. Vi anbefaler eller læsere dog at prøve CyberGhost. Denne VPN-tjeneste er så enkel som den bliver og giver dig også servere placeret i forskellige lande. Det har endda separate VPN-servere, som nemt kan streame Netflix og BBC. Følg nedenstående trin for at downloade applikationen og sikre din forbindelse på ingen tid.
- Download CyberGhost from (here).

- After downloading the VPN, install it on your computer. You might be asked for proper permissions. Make sure that you are logged in as an administrator and press Yes to all the permissions asked.
- After CyberGhost is installed on your computer, launch it. Here you will see a list of different servers available along with the distance from your actual location (more distance means slower internet).

- After selecting the server, click on the power button present at the right-hand side of the application. You can also select dedicated servers for torrenting and streaming (present at the left navigation pane).
Solution 8: Disable Firewall
In some cases, the default Windows Firewall might be preventing the application from working properly. Therefore, in this step, we will first be allowing it through the Firewall and make sure that it isn’t blocked by the Firewall and then we will also make sure that Windows Defender has it added as an exception. For that:
- Press “Windows” + “R” to launch the Run prompt.
- Type in “ControlPanel” and press “Enter” to launch the classical control panel interface.

- Click on the “View by:” button, select “Large Icons” and then click on the Windows Defender Firewall option.
- Select the “Allow an app orfeature through the Firewall” button on the left pane and then click on the “Change Settings” button and accept the prompt.
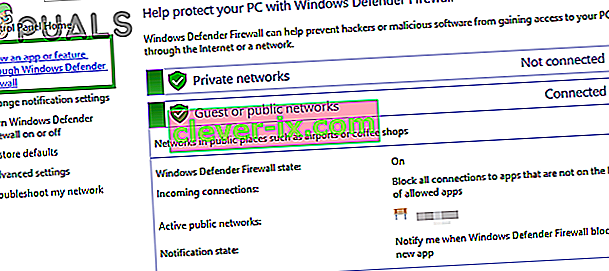
- From here, make sure that you check both the “Public” and the “Private” options for Nord VPN and its related applications/drivers.
- Save your changes and exit out of the window.
- After that, press “Windows” + “I” to launch the settings and click on the “Updateand Security” option.

- From the left pane, click on the “Windows Security” button and then click on the “Virus and Threat Protection” button.
- Select the “Manage Settings” button under the Virus and Threat Protection Settings heading.
- Scroll down and click on the “Add or Remove Exclusions” button in the next window.
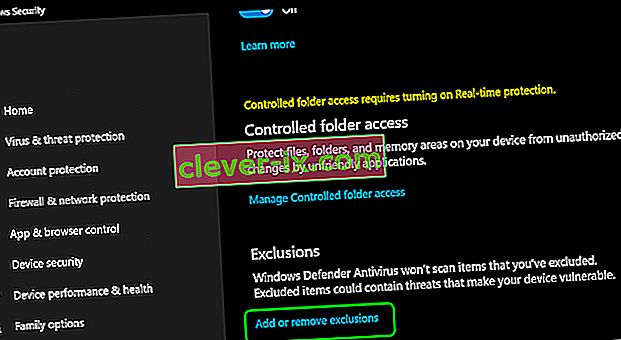
- Click on the “Add an Exclusion” option and select “Folder’ from the File type.
- Make sure to specify the Nord VPN folder and exit out of this window after saving your changes
- Check and see if doing so has fixed the issue with Nord VPN not connecting.


Solution 9: Change NordVPN Protocol
It is possible that Nord VPN might be running into issues while trying to connect to its servers due to the protocol configuration in its settings. If one type of protocol isn’t working for you, it is always recommended to try and switch to the other protocol to make sure that the issue isn’t tied to the wrong selection of the protocol type automatically or manually. For that:
- Launch NordVPN and make sure to disconnect from any currently active sessions.
- Click on the “Gear” icon on the top right corner and go into the settings.
- Click on the “Advanced” option from the left-hand side menu.
- Click on the “Protocol” dropdown and check on “TCP”.
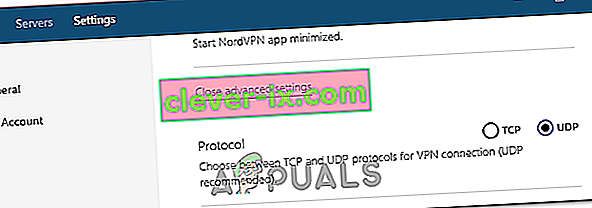
- This should change your protocol from TCP to UDP.
- Check to see if doing so fixes the issue for your computer.
- To Verify that none of the protocols work, make sure to repeat the steps and select “UDP” instead of TCP and then check again.
- If none of the selected protocols are able to make a connection with the server, move on to the other fixes.

Solution 10: Changing DNS Server Configuration
DNS Servers are used by the computer to establish a stable and secure internet connection with other sites on the internet, however, if the computer is unable to detect the DNS settings properly, or if the selected DNS server is facing outage, Nord VPN might not connect properly. Therefore, in this step, we will be changing the DNS configuration to ensure that DNS isn’t an issue. For that:
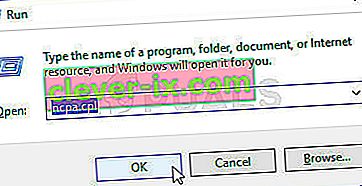
- Press “Windows” + “R” to launch the Run prompt.
- Type in “ncpa.cpl” and press “Enter” on the keyboard to launch the network configuration panel.
- Right-click on your internet connection and select the “Properties” option.
- Double click on the “Internet Protocol Version4 (TCP/IPV4)” option and check on the “Use the following DNS addresses” button.
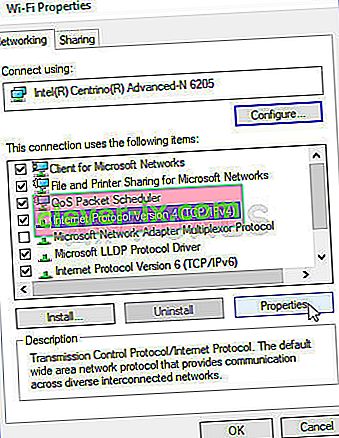
- At first, type in “8.8.8.8” and “8.8.4.4” in the primary and the secondary DNS addresses field respectively and click on “OK”. After that, check to see if NordVPN is connecting, if it isn’t, try to use “103.86.96.100” and “103.86.99.100” in the primary and the secondary fields respectively.
- Check to see if you are able to make a connection by selecting those DNS servers.


Solution 11: Opening Ports
For some people, the issue might arise if the ports that NordVPN uses to communicate with its servers are being blocked by your router. For security reasons most routers often block ports used by VPN/Network Tools to prevent any alterations to your connections and if that is the case, we will have to open the ports by logging in to the router’s control panel. For that:
- Press “Windows” + “R” to launch the Run prompt and type in “cmd” and then press “Ctrl” + “Shift’ + “Enter” keys on your keyboard to provide admin permissions.

- Type in the following command in the command prompt to list the IP information.
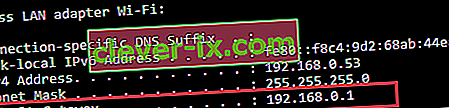
ipconfig /all
- The computer will list all the information of the network adapters connected to your computer.
- Under the default gateway option, after the mac address, there should be an IP address that should look something like “192.168.x.x”.
- Copy this IP address and launch your browser.
- Paste the IP address within a new tab on the browser and press “Enter” to navigate to the browser’s login page.
- Once on the login page, log into the control panel with your credentials, both of which, i.e the username and password should be written on the back of your internet router. If not, then the username should be admin and the password should be the Wifi password that you use to connect your devices.
- After logging into the Control panel, look around for a “NAT” or “Port” option that allows you to forward ports.
- Type in “500” and select “UDP” from the list.
- Click on “Save” to forward the 500 UDP port and exit out of the control panel after the change has been made.
- Try connecting with Nord VPN and check to see if the issue persists.


Solution 12: Use Hotspot
Mostly, this error can be fixed simply by employing your mobile’s hotspot connection instead of the Wifi or the Wired connection that you are already using on your computer. This does seem an inconvenience for Data conscious people but it seems to be the only way some people are able to connect through Nord VPN as some routers block it completely.
Note: In addition to this, you can try to change the firmware on your router to avoid any permanent blocks put from the router or to eliminate any bugs with the connection.


